Wednesday, May 27, 2015

Buffalo Chicken Pasta

Once again, necessity is the mother of invention, or supper as the case may be.  One of the joys of home ownership is getting to do yard work.  Since the good wife had mowed the yard I got to do the weed eating.  Of course, I'd still get to do it even if I'd mown the grass.  Doing that along with pulling up a metal fence post and taking some scrap metal to the curb for pick up by the scrapers then helping the neighbor across the street carry some bundled brush to the curb it ended up being fairly late.  We'd done all this work and not thought about supper.

One thing that helped us is that we still have some dry pasta in the cabinet that we hadn't gotten rid of since I started making fresh pasta.  Rigatoni got the nod as it would hold plenty of buffalo sauce and would be a satisfying chew.  Plus, we always have chicken breasts in the freezer.  We get the big bag of individually wrapped chicken breasts at BJ's.

This recipe is super simple yet oh so tasty.


Buffalo Chicken Pasta

Ingredients:

3 boneless, skinless chicken breasts
8 oz dried pasta of your choice
salt
pepper
olive oil
Buffalo sauce, recipe to follow

Slice the chicken into bite sized pieces.  Season with salt and pepper.  Cook in a large skillet with olive oil.  When the chicken is done add Buffalo sauce and simmer.

Cook pasta according to package directions.  When it is at your desired doneness remove it from the water and add to the skillet with the chicken.  Stir it around to get the chicken and sauce evenly distributed with the pasta.  Add more Buffalo sauce if needed.

Plate it up and add grated or shaved cheese on top if desired.

Topped with grated Mozzarella
The Buffalo sauce is an easy recipe also since a big part of it is already do for you.

Combine 1 cup Frank's Red Hot hot sauce, 1/2 to 1 stick of butter, 2 tsp garlic powder, and 2 tsp cayenne powder in a small pot on medium heat.  Once butter has melted stir to combine and let simmer.  This is not a crazy hot Buffalo sauce but it does have a nice heat and tons of flavor.  Of course you can vary the cayenne to suit your tastes.  Any leftover can be stored in the refrigerator till you need it.

Tuesday, May 26, 2015

Chicken Cordon Bleu, Fried Asparagus, and Potato Soup

Our kitchen refrigerator's compressor is dead.  While we wait for a new one to come in we are thankful that we have a garage refrigerator and a freezer to put everything that had been in the kitchen refrigerator.  This has led to a tightly packed garage fridge and the need to use up stuff to make room.  Enter tonight's supper.

Last fall we had turnips in the garden and after some were canned we had about 2 quarts of the cooking liquid left over.  Some was used to make a potato soup that turned out quite nicely and the rest was kept in the garage fridge for a future soup.  What it was used for was a Bacon Cheddar Potato Soup and that recipe will below.

The good wife was expecting just the soup for supper but since it is getting warm here in coastal Virginia I decided the soup would just be a part of supper not the whole meal.  The centerpiece was Uncle T's baked Chicken Cordon Bleu.  The other accompaniment was fried asparagus.


 The baked Chicken Cordon Bleu was pretty simple.  Cut a pocket in the chicken breast leaving a 1.5 inch hole.  Put in a good chunk of sharp cheddar cheese and I put in some Uncle T's loin bacon.  The chicken was seasoned with salt, pepper, and garlic powder then rolled in plain Panko bread crumbs.  A couple of small bits of butter were put on top of each breast and they were baked at 375 for 30 - 35 minutes until they reached 160 degrees internal temperature.  Since you won't have Uncle T's loin bacon on hand I'd suggest some Black Forest Ham or Prosciutto.

The asparagus was even simpler.  The Asparagus was trimmed then rolled in corn starch.  Then it was fried in skillet with enough oil to just cover the asparagus.  Once it had browned a bit the asparagus was put on a rack to drain and sprinkled with salt.

Now, for the pièce de résistance, the Bacon Cheddar Potato Soup.  These directions are for making it in the Vitamix but I'll have suggestions in case you don't have one.

Bacon Cheddar Potato Soup
Ingredients:
4 medium potatoes
1 cup grated sharp cheddar cheese
6 oz Uncle T's loin bacon, cooked
2 cups turnip broth, a generic vegetable broth could be used.
1/2 to 3/4 cup milk
salt and white pepper to taste

Dice the potatoes to 1/4 inch cubes.  Rinse them thoroughly and boil till just short of being done.  Drain and hold them.  Put 2 cups of turnip broth in the Vitamix.  Add 2/3 of the cooked potatoes and salt and pepper.  Turn the Vitamix on high for 30 seconds then off to check consistency, then add the milk.  Turn on for another minute then take the cap off to see if steam has started rising.  Once it starts steaming, add the grated sharp cheddar cheese and run until the cheese is fully incorporated.  At this point the soup should almost be hot enough.  Turn off the Vitamix if you are not quite ready for the soup.  When you are ready for the soup, turn the Vitamix on high and run until the soup is hot.  Stop the machine and add the bacon.  Turn the machine on high for about 15 - 20 seconds, this should chop up the bacon but still leave identifiable bits in the soup.  Stop the machine and add the remaining potatoes.  Turn the Vitamix on medium for just long enough to completely spread the potatoes through the soup be not chop them up.  Serve.

If you don't have a Vitamix, chances are you have a regular blender or an immersion blender.  If you have a regular blender use it to mix the broth and potatoes then transfer them to a pot to heat.  Some of the blended potatoes and broth can be kept in the blender to help it with the bacon.  Once the soup is hot then stir in the cheese.

This is a thick rich soup with lots of flavor.  If I was going to make it in the winter I'd be likely to use heavy cream instead of milk to make it richer.  The soup can definitely stand on its own merits if you are wanting just soup for a meal

In the end, I cleared out the last jar of turnip broth from the fridge and we had a fine tasty meal.  I hope you give some of these a try.  If you do, let me know how you liked it.

Uncle T


Porky Pancakes

Most days I don't do breakfast.  I may eat a snack mid-morning but that is about it.  I do keep ready made porridge in the office refrigerator for this purpose.  Weekends and holidays are a different story.  I make a good breakfast on Saturday mornings and holiday mornings if I'm not at work.  So we're always looking for something different to add to the breakfast rotation.

One of the Youtube channels I subscribe to is River Cottage.  It is a group in England that do videos on every aspect of food.  They have people that show how to raise a particular crop and others that cook with it.  They also have a master baker and a guy that has written books about charcuterie and processing your own animals.  Needless to say, there are many interesting recipes.  The one that concerns us today is Porky Pancakes.  You can see it here, https://youtu.be/HJ9wYMjpicw.

I bet you haven't thought about a savory pancake.  Their version includes cooking oysters in heavy cream to serve over the top of the pancakes.  Well, oysters are not something that is usually on hand and we didn't feel like getting out the night before to find some.  We figured some good syrup over them would be a nice contrast between the savory and the sweet.  The good wife was quite pleased with the outcome.

This is after putting two pancakes on each of our plates.
 For the bacon, I used a combination of commercially produced bacon and some of my peppered loin bacon.  The commercial bacon was the last package in the freezer so I figured this would be a good use for it.  The bacon not used for the pancakes got cooked up to accompany the pancakes.

Porky Pancakes

Ingredients:

150 - 200 g flour, I used 200 g (this is a bit over 7 oz so you could use a scant cup of flour)
1 egg
1 Tbs baking powder
3 - 4 strips of thick cut bacon
1 onion
pepper
milk
olive oil
butter

Cut the bacon into thin lardons.  Finely dice the onion.  Put a bit of olive oil in a skillet and add the bacon and onion and cook.  The bacon will be cooked by the time the onion is tender.

Put flour, baking powder, and the egg in a bowl.  Start adding milk a little at a time and stirring.  You want a thicker batter than usual for pancakes.  Add a few grinds of pepper or a good pinch if you don't have a grinder.

Add the bacon and onion to the pancake batter and mix it in.  Add a couple of Tbs of butter to the skillet.  Once it is hot start dropping the batter in making about a 4 inch pancake.  Cook both sides till they are nicely brown and remove them to a plate to repeat the process till you've used all the batter.

Serve with good syrup or molasses.

Two nice pancakes and combination of different bacons.
This is a keeper in our breakfast rotation.  About the only thing I'd do different would be to do my prep, on the bacon and onion, the night before.  It doesn't take that long but that way I could get them cooking right away while the oven is preheating and I'm mixing up the batter.

Light, fluffy, and full of flavor.

I'm thinking I could do something similar with some of my venison sausage.  Give this recipe a go and see how you like it.  I think it'll be a repeat on your table too.

Uncle T

Friday, May 15, 2015

Fear Not the Yeast

From reading various food blogs and the comments on posts about bread, it seems many people almost fear yeast.  If not fear, then it is looked  upon as some sort of dark magic not to be messed with.  Yeast is our friend in many ways.  Wild yeast fermentation gives us sour kraut and kim chi.  Other yeast varieties give us beers and wines.  Then there's baker's yeast.  Yeast coupled with gluten gives bread lift and depending on the length of the rise adds some wonderful flavors.  This brings us to the where we are now.

We don't eat bread with meals very often at our house.  Matter of fact, most weeks the only bread I eat is toast for breakfast on Saturday and Sunday mornings.  The good wife will eat some home made Cranberry Walnut Cinnamon bread with a nut butter spread on it.  However, there are some meals that seem to require bread, or at least are better with bread.

The Seafood Stew of Necessity from a previous post is one such meal.  I just didn't think about it in time.  After all, bread does take some time.  So, when we ate the leftovers I made sure to have bread.  I made a nice little French Bread loaf.

I'll add this now, you can find some excellent recipes, usually on someone's blog, as a pin on Pinterest.  Yes,  that is where I found this recipe.

I have several bread recipes in my Tested Recipes board on Pinterest that are very tasty.  I was going to use one of those but I saw one that said it was simple so I opened it up to check it out.  The time requirement for this recipe is the same but you let your stand mixer do the work for you.  Here is the link to the recipe, http://www.thebakerupstairs.com/2012/09/french-bread.html.

After I got the KitchenAid set up I ran into a problem.  I didn't have enough yeast on hand.  I actually had half the called for amount.  The good wife says, "can you make a half recipe?"  Yep, all the measurements are easily cut in half so away I went.


After the rise ready for the egg wash.
According to the recipe, once you have the dough together, you turn off the machine and let it rest for 10 minutes.  After that rest, you use the dough hook on your mixer to knead it for 10 seconds.  You repeat that process 5 times.  After that, you roll it into your loaf shape and let it rise for 30 minutes.  Don't forget to cut slits in the top.  After the rise, brush the top with an egg wash and bake it for 30 minutes and you're done.

Fresh from the oven.
Now, does this bread have the depth of flavor that others do?  No.  Does it taste better than what you'd pick up at the store?  Yes.  It turned out with a nice light crumb and good mouth feel and a good flavor.  It was very good with some good butter on it and was a great accompaniment to the stew.

Bring on the butter.
If you don't have a stand mixer, you can do it by hand.  I only got the KitchenAid fairly recently so doing it by hand is no big deal.  Give this one a try sometime.  I think you'll like it.


Uncle T

Wednesday, May 13, 2015

Nut Butters

OK, I know everyone is familiar with Peanut Butter and maybe even a few other combinations that can be found in health food stores.  This can lead one to ask, Why is Uncle T talking about nut butters?  As usual, it comes down to what you make yourself tastes better and is probably better for you than what you can buy.

A bit over 2 years ago we stopped to watch a demonstration of the Vitamix at the local base exchange.  We were impressed with the smoothies, the soups, and the ice cream it could make as well as the ease of clean up.  Another great thing is that you can use the whole fruit or vegetable and it will still be reduced to a fine smoothie full of beneficial fiber and vitamins.  However, we still deemed it a bit pricey and were about to leave.  I'd been talking food with the guy about food and before we walked away he brought out something not on the demo list, Peanut Butter.  The only thing in it was peanuts and a bit of salt since he'd used salted dry roasted peanuts.  It was great.  The good wife frequently eats peanut butter on a bit of toast for breakfast and she really liked it.  In the end, we bought the Vitamix.


The Vitamix loaded up and ready to go.
 For the next several months, I made Peanut Butter as it was required and it was still tastier than store bought.  Then I mentioned that MREs that I was inspecting had a Chocolate Peanut Butter which got the wheels in the good wife's brain going.  That turned into, couldn't you do that in the Vitamix?  Yep, and it turned out fairly well also.  Finally,  one day when we were at the hippie store (Organic Food Depot) and we saw Almond Butter and Cashew Butter.  We bought small sample packages to try to see if we liked them, we did.

Now, things got to be interesting.  The good wife's sister has a Pecan tree in the back yard so they end up with many many Pecans.  What do you do with that many Pecans?  You do whatever you can think of so a couple of gallon bags of shelled Pecans arrived in short order.  They were roasted and salted and made a dandy snack but that is not why they were sent.  They were destined for the VitaMix.

I'd been making a mixed nut butter by using the big can of mixed nuts and having the different varieties and flavors made an exceptional nut butter.  What we came up with as a use for the Pecans was to make Pecan-Almond Butter and Pecan-Cashew Butter.

So, a couple of weekends ago I was making the Pecan-Almond and Pecan-Cashew Butters because I had been informed that my dear sister in law was out.  After they were made and labeled, the good wife asked how many Pecans were left.  We had a good bit left and our stock of nut butters was pretty high.  It was suggested that I make another jar since there would be room in the box to be shipped.  We found a suitable jar and I started getting the nuts back out of storage and then it hit me, Pecan-Almond-Cashew Butter!


Freshly ground Pecan-Almond-Cashew Butter
The Pecan-Almond-Cashew Butter turned out great.  I believe it is the best of the lot with the blending of those three great flavors.  My good wife got a sample spoon to taste and declared it a keeper.  Remember, the only things in this are the nuts and the salt that is on them.

Now on to the recipes.

Roasted Pecans

1 stick butter
6 cups Pecans
salt, to taste

Melt the butter.  Pour it over the Pecans in a large bowl.  Toss to evenly coat the Pecans.  Spread them on a cookie sheet in a single layer.  Sprinkle salt over them.  Roast in 300 - 325 degree oven for 10 - 20 minutes.  Stir them around every 5 - 10 minutes.  Keep and eye on them so they don't get too dark.

Nut Butters, this is the Peanut Butter recipe from the Vitamix book.  I'm just using different nuts.

3 cups of nuts.  If more than one type then split evenly.

Turn on Vitamix on High for 1 - 2 minutes or until desired consistency is reached.


A pint jar almost full.  A full pint jar went to a neighbor, we got the partial.
See, nothing too it.  We took inspiration from something we saw in a store and made it better by making it fresh.

There was another Vitamix demo at the exchange this weekend and I talked to the Demonstrator and she said that she had owned a Vitamix for 12 years and had only made Peanut Butter.  She hadn't even thought of other nuts.  I may have to send the recipe into Vitamix for their online recipe files. 

A spoon full of nutty goodness
Give some of the alternative nut butters a try.  If you can make them yourself, so much the better.

Uncle T


Monday, May 11, 2015

Seafood Stew of Necessity

As the name suggests, this recipe is the result of necessity.

I had to come up with this because Sears Home Service is falling down on the job.  Back in November 2013 we bought a Kenmore Elite bottom freezer refrigerator.  This thing is 30 cubic feet of storage space and I fell in love with it.  Due to the cost, we also got the Service Protection Agreement.  After a bit over a year it started acting up and we've had 4 service calls since the first of the year.  Nothing has worked to this point.  When I checked it Saturday morning the freezer was 40 degrees.  Luckily, we have a garage refrigerator and a couple of freezers to move stuff to.  Unfortunately, the seafood had thawed and refrozen seafood looses a lot in terms of quality if it is refrozen.


So, the items that got thawed were shrimp (31 - 40), scallops, and Whiting.  Then came the pondering about how to use them all quickly.  Then the light bulb flashed on and Seafood Stew of Necessity was born.  OK, it wasn't quite that quick.  The idea was for a soup/stew and to use all three packages of seafood.  Naturally, the idea bounced around in the dark recesses of my mind all day Sunday and while I was at work today and this is the result.


Now, on to Seafood Stew of Necessity.


Ingredients:
10 -  12 oz. raw peeled shrimp
6 - 8 oz. bay scallops
12 - 16 oz. Whiting fish
3 cups water
1 - 1.5 cups white wine
1 Tbs seafood soup base
1 15 oz. can dices tomatoes
6 Kale leaves, destemmed and cut in bite size pieces
1 Tbs garlic powder
1.5 tsp salt
1 tsp ground black pepper
1 Tbs Italian seasoning

Combine the water, wine, and seafood soup base and bring to a boil.  Add the tomatoes and kale and return to a boil.  Add the salt, pepper, and garlic powder and stir it in.  Add the shrimp, scallops, and Whiting and gently stir in.  Let it simmer until the seafood is done.  It won't take long.  Serve and enjoy.

Seafood Stew of Necessity in the pot ready to serve.


 If you have some good crusty bread to go with it this should feed four people.  I didn't think of bread until too late so we ate heavy but there is enough to have a smaller serving for each with some good crusty bread.  The good wife declared this recipe a keeper and that it should be done again,   She did add the caveat of doing it without having the refrigerator go bad.

My bowl, it left me full and content.

Like I always say, think about the flavors you like and the ingredients you have on hand and mix and match according to what works with each other.  Experiment and throw yourself into the creative process with utter abandon.  Taste your creation, evaluate it, and add what you think it needs to make it sing.  Recipes should be general guidelines rather than set formulas.  Make the dish suit you.

Give this one a go and let your creative juices flow.  I think you'll like what you come up with.

Uncle T


Friday, May 8, 2015

Quinoa and Chicken Sausage

What do you know about Quinoa?  About all I knew was that it is a South American seed that is currently in vogue as the latest "super food".  I still don't know much beyond some of the nutritional benefits and a bit of the history of its use.  It might find its way into our kitchen on an infrequent basis because the price point to my mind doesn't favor using it in place of other products.

I don't do food fads so I had pretty much ignored any mention of Quinoa.  This changed last week.  Our son and his fiance told us about a casserole made with Quinoa and Chicken Sausage and some other things as well.  We thought it sounded good and had them send the recipe.

Finding chicken sausage is not easily done, at least not in this area.  Besides, why should Uncle T buy chicken sausage when he can make it himself?  I had come by some pre-seasoned  chicken fajita strips and they had been taking up space in the freezer.  I thawed them and some chicken leg quarters all of which were ready to process on Sunday afternoon.

So, today you'll get two recipes, one for the smoked chicken sausage and the Quinoa and Chicken Sausage casserole.

Smoked Chicken Sausage

4 lbs ground chicken
2 T kosher salt
1 T Uncle T's seasoning mix #2
2 T dried mint leaves
1.5 T anise
1 T fennel seed
1 T turmeric
1 cup Feta cheese, crumbled
3/4 cup red wine
Optional
1 tsp Prague Powder # 1, if smoking the chicken
9 feet hog casings

Grind the chicken, or you can get ground chicken from the store.  Combine all ingredients in a large bowl.  Mix thoroughly until the mixture is sticky.  Form the chicken into links.

If you have a sausage stuffer, you can use hog casings.  I used 32 mm casings.  Let hang for an hour then smoke them until they reach 160 degrees internal temp.  Chill in ice bath and package.

If you don't have a sausage stuffer you can use sections of plastic wrap.  Lay the chicken mixture, about a 2 inch ridge, along one edge of the plastic wrap.  Roll the chicken mixture up in the plastic wrap forming a log and tie off the ends.  Poach the logs in 180 degree water until the chicken reaches 160 degrees internal temp.  Chill in ice bath and package until ready to use.

In the stuffer ready to go.
Freshly linked and ready to hang.
                       
Out of the smoker and chilled.

Now for the Quinoa and Chicken Sausage casserole.  As a reminder, this is not my recipe but one I got from my son and his fiance.  I think they got it from Advocare.

Ingredients:
1 cup Quinoa, soaked and rinsed, uncooked
2 cups chicken broth
1/2 cup sun dried tomatoes, julienned  (I bought ready cut packed in oil)
1 T olive oil (I used the oil from the tomatoes)
2 stalks kale, destalked and cut in bite size pieces (I figure they mean leaves, I doubled the kale)
5 chicken sausages, cooked and sliced into bite size pieces.
1/4 cup red onion, diced (I made thin slices instead)
salt and pepper to taste
1 tsp garlic salt (I used 1 T of garlic powder)
fresh Basil, to taste

Pre-heat oven to 350.  Put Quinoa and chicken broth in large casserole dish.  Spread kale on top.  Spread the sun dried tomatoes evenly on top.  Add the red onion.  Drizzle the olive oil over the ingredients.  Season with salt, pepper and garlic salt.  Spread the chicken sausage over the top of everything.

Put in the oven at 350 and cook about 60 minutes until the Quinoa is fully cooked.  Let cool 5 - 10 minutes and serve with fresh Basil.

I used my 5 qt cast iron covered casserole.  I let it go 45 minutes with the cover on then tested the doneness of the Quinoa.  It went back in the oven for another 10 minutes with the lid off.

Hot out of the oven.

Hot, tasty, and very filling.
This recipe was quite tasty and I believe it would do well with other grains as well.  This one dish made enough to feed us for two suppers and one good lunch for me.  As I said, very filling.  Give it a try.

Uncle T


Tuesday, May 5, 2015

Smoking Ribs

The other day, I was told that the Commissary on one of the local bases was having a case sale and that pork spare ribs were $.70 below the usual price per pound.  Needless to say, we went over there after I got home from work and got some.  It seemed appropriate to thaw one out and have it for supper Saturday night.  The only thing different with this one from my usual routine was I tested a Rib Rub I'm developing.

On to how Uncle T preps and smokes his ribs.  There is nothing secret and I'm sure you can find a few dozen videos on YouTube detailing this but it needs to be included.  About all I usually do is cut off the remaining bit of the diaphragm and remove the membrane from the back of the ribs.


With this one, I cut off the sternum and squared up the end converting the spare ribs into St Louis style ribs.  Not to worry, the parts that got trimmed off got cut up into bite size pieces, seasoned with Uncle T's pork and poultry rub, and pan fried and eaten as a snack Saturday afternoon.


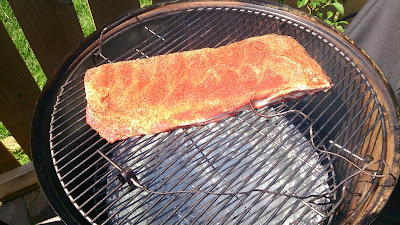
Apply the rub and let it set for an hour.  This does a couple of things, it gets the ribs to close to room temperature and lets the rub get into the meat.

While the meat is resting, prep the smoker and get your coals started.  I use a chimney to start my coals.  The hot coals get dumped at the right side of the gap in the charcoal ring and a piece of apple wood gets put on the hot coals to start the smoke.


Once the smoker is going put the ribs in and shut the lid.  As you can see, I have two thermometer probes in the smoker, one for the smoker and one for the meat.  I use a Maverick ET-732.  It has the unit that the probes plug into and a receiver that I can take with me to keep track of the temps where ever I happen to be.  It has a range of 300 feet.  You can see the transmitter hanging from the smoker and that nice bit of apple wood smoke.


The ribs have reached 155 degrees.  They are cooked at this point but still have a ways to go to be tender.  At this point, they'd been in the smoker for 3.5 hours at an average temperature of 195 degrees.


To get them tender, you either need to get them to a higher temperature, similar to a beef brisket, via more time in the smoker or you can cheat.  I used what is called a Texas Cheat.  That is wrapping the ribs in aluminum foil and putting them back in the smoker to steam.  This gets the temperature up quicker than just being in the smoker.  For these ribs, I put about a 1/4 cup of whiskey in the foil with the ribs to add a bit extra flavor and give some more steam.  They stayed in the foil for 1.5 hours.  Some folks online say to take the ribs out of the foil and put them back in the smoker to put a crust on the ribs.  I've never understood the appeal of crusty meat.


After letting the meat rest for a bit it is time to cut them apart and dig in.  They have a nice smoke ring, they are juicy and tender, and they taste pretty good.


 I figured out a couple of tweaks to make to my rib rub before I start letting others test it.  The ribs were accompanied by home made waffle fries.  You can't beat smoked pork and fried potatoes on a Saturday night.

I know, nothing earth shaking in this post.  However, many folks seem to think that good ribs can't be done at home so if this helps demystify the process then I'll call it good.  The technique does not require a smoker.  If you have a grill, charcoal or gas, you can set it up for indirect heat add some wood to make smoke and get the same results.  So, put some meat in the smoke and enjoy.

Uncle T


Saturday, May 2, 2015

Ooooh, Pancetta!

As you may recall, I mentioned in the Glorious Pork post, I had some Pancetta set out to age.  For the past 5 - 6 weeks this Pancetta has been wrapped in cheese cloth and hanging in my garage.  I opened it up yesterday and Oh My Goodness!


As a reminder, I used the recipe from the book, Charcuterie by Michael Ruhlman and Brian Polcyn.  It is available here, http://www.amazon.com/Charcuterie-Craft-Salting-Smoking-Curing/dp/0393058298.  The only difference is I used a bit more Juniper Berry  Of course, I don't have a fancy curing chamber so that is why I used the garage.  The garage stayed in the general temperature range and the cheese cloth wrapping made sure the surface didn't dry out too fast since I had no way to control the humidity.


Here is the Pancetta newly tied and ready to wrap in the cheese cloth.  If you want to learn a quick easy way to tie a roast or Pancetta check out The Scott Rea Project on Youtube and look up "How to tie a Butcher's Knot".  I couldn't get the link to work posting it here. 


Here is the Pancetta unveiled.  It got a squeeze each day when I got home from work to make sure it wasn't case hardening.  The cheese cloth did its job and slowed the rate of moisture loss making up for the lack of humidity control.


Yes, I had a time getting the butcher's twine off the Pancetta.  The best part was cutting into it and testing a sample.  There is no way I can adequately describe the silky texture, the excellent porkiness, or the subtle flavor notes added by the cure and flavoring agents.


Regrettably, I forgot to weigh it before it started its aging hang and when I opened it up.  I'm not sure how that happened as I usually go by a percentage of weight to determine the aging time.  After putting it on the slicer and packaging it we ended up with 8 packages of thin slices for charcuterie dinners and 5 packages of thicker slices to use for making my version of spaghetti carbonara.

Wonderful things  happen when you combine salt and other seasoning/curing agents, good pork, and time together.  Give it a try and you won't be disappointed.


Uncle T