Monday, September 12, 2016

Shrimp in a Peanut Garlic Sauce

By now, you've probably figured out that we enjoy the cuisine of many countries.  Indian food is no different.  We've always gone to an Indian restaurant since all the recipes I've looked at have always seemed either overly complicated or had several ingredients that I don't keep on hand and didn't know where to find.  There may be one but I've not found an Indian market close to us where I could get those ingredients.


I was looking around at Indian and Indian inspired recipes last week and I found one that had ingredients that I had or could alter to what I had on hand.  Using what I had on hand also changed both the texture and flavor profile.  We've decided that this is a keeper recipe.  I'm calling this an Indian inspired recipe because I adapted a recipe that was adapted from a curry cookbook that was written by an Indian Chef, 660 Curries.  From what I've read about the author I may have to get this book.


One of the key changes was in the peanut requirement.  The original called for blanched peanuts to be crushed and added to the sauce.  Those peanuts are rather flavorless and only provide a bit of texture to the sauce.  I decided to use some of our homemade mixed nut butter instead.  I leave a bit of graininess to this butter when I process it and the flavor is out of this world. 


This shrimp dish is good served over rice or cauliflower rice.  Not only that, it is quick and simple to make. 


Shrimp in Peanut Garlic Sauce


1 lb shrimp, peeled and deveined, size is your preference
1/2 - 1 tsp ground turmeric
1/4 cup nut butter
4 - 8 large cloves garlic
3 Thai chilies
2 Tbs canola oil
1 cup unsweetened coconut milk
salt
cilantro


Place shrimp in a bowl and sprinkle with ground turmeric to suit you.  I was using 35 - 40 size shrimp so I used a good teaspoon of turmeric.  Toss to coat well and let sit for 15 - 30 minutes.


While the shrimp is sitting, mince the garlic and chilies.  Add the oil to a skillet and bring up to medium heat.  Add the garlic and chilies and stir.  After they've cooked about a minute, add the nut butter and stir.


Once the nut butter, garlic, and chilies have browned a bit, stir in the coconut milk.  Be sure to shake the can before you open it.  Bring it up to a boil and reduce to a simmer.  Add salt to taste.  Simmer for 2 minutes and add the shrimp.  Bring back to a simmer and cook until shrimp are done, about 3 - 5 minutes.


Serve over rice or cauliflower rice and sprinkle with cilantro.
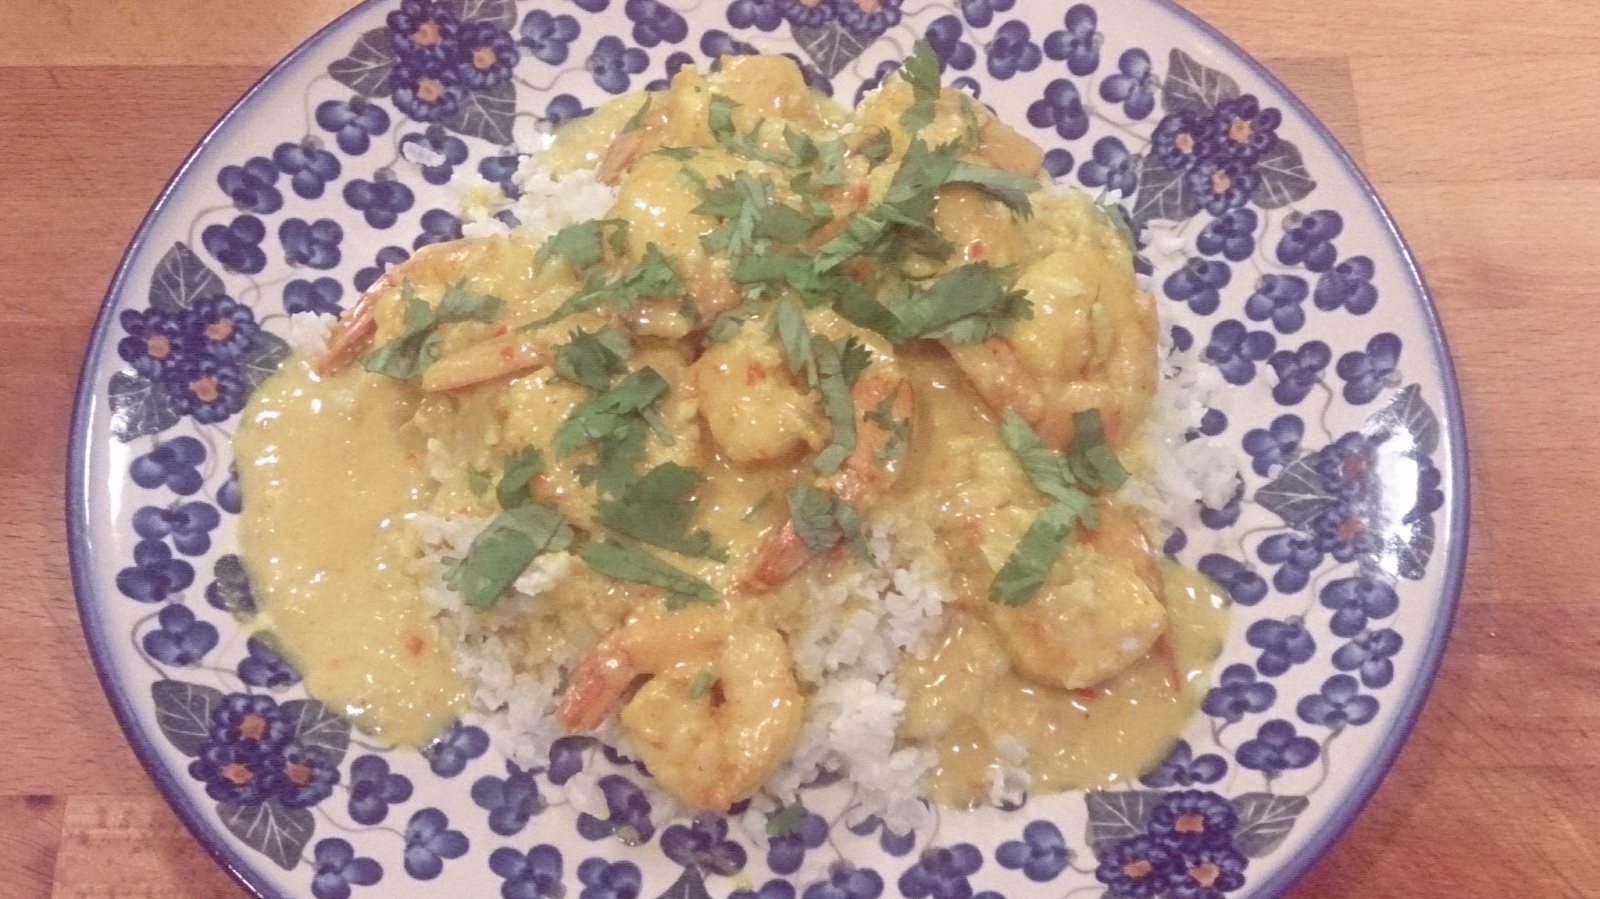
Shrimp in a Peanut Garlic Sauce over Cauliflower Rice
I used some of my dried Thai Dragon peppers instead of fresh peppers because I didn't grow any Thai peppers this year.  I just minced them up dry instead of rehydrating them.  If you can't find Thai peppers then cayenne peppers are a good substitute.  You should be able to find both at a good Asian store.


Give this recipe a try and expand your kitchen repertoire.

Sunday, August 28, 2016

Tomato Fettuccine with Shrimp and Asparagus

A good bit of the fruit and vegetables that we eat comes from our garden and fruit trees.  At the peak of each season the good wife is kept busy canning the excess so we can eat it throughout the year until the next harvest season.  Tomatoes have been coming in strong for a bit now and we have 17 pints of homemade ketchup and 11 quarts and 1 pint of tomatoes canned for making sauces or adding to stews.  Earlier in the season the good wife found a website, http://joybileefarm.com/making-tomato-powder-scratch/?utm_content=buffer67519&utm_medium=social&utm_source=facebook.com&utm_campaign=buffer, suggested an alternate use for the tomato skins that get removed prior to processing and canning.  The use she found was drying and grinding to powder to use for seasoning, thickening, etc.  Making powder was in lieu of composting or feeding to the chickens according to the website.  We'd always composted them.  The process is simple, put the tomato skins in a dehydrator or on a rack in the oven at the lowest temperature setting and letting dry until they were brittle.  Once they are brittle put in them in a food processor, blender, or spice mill.  I used the dry blade container for the Vitamix.  The powder is concentrated tomato flavor.
Tomato skins laid out ready to dry

Tomato powder
To this point we have about two cups of tomato powder and I was brainstorming on a use.  I've been trying flavored pastas with mixed results so I decided to use the same technique I'd used for some mushroom Fettuccine.  Once I had decided on pasta I Googled to see if tomato pasta was a thing.  Unsurprisingly, it was.  They all used tomato paste and it only seemed to be there to color the pasta and add a bare hint of flavor.  I figured my way would yield good flavor and color.
Tomato pasta freshly kneaded and ready to rest
What kind of pasta to make generated some discussion at work during a break.  The choices came down to cheese and shrimp stuffed ravioli or fettuccine.  I settled on fettuccine because it would be less labor intensive and I was wanting to use some asparagus that I had in the refrigerator.  I only had about 8 ounces of mushrooms on hand so I didn't have as many as I'd have liked.

Tomato Pasta with Shrimp and Asparagus

Pasta:
1.5 cups flour
1/2 cup + 2 Tbs tomato powder
3 large eggs
1 tsp salt
1 Tbs olive oil
2 Tbs water

1 lb 31-35 count shrimp
1 lb asparagus
1 medium onion
1/2 - 1 lb mushrooms
1 cup white wine
1 stick butter
salt
pepper
Italian seasoning

For the pasta:  Combine the flour, the tomato powder, and salt.  Make a well in the center and add the eggs, water, and olive oil.  Mix everything together until well combined and turn out on a floured surface.  Knead the pasta until it is smooth and elastic.  Wrap in plastic and let it sit for 20 minutes.  Divide into 4 pieces and roll to desired thickness and cut to the size you want.  After the pasta is cut place in well salted boiling water and cook until almost done.
Tomato pasta ready to run through the cutter
While the pasta dough is resting, cut the asparagus into bite size pieces, thinly slice the onion, and slice the mushrooms.  In 2 Tbs of  butter sautee the asparagus and onion, season to taste, and then place in a bowl.  Sautee the mushrooms in 2 Tbs of butter until they are done and put in the bowl with the asparagus and onion.  Place the shrimp in the skillet with the rest of the butter and put the pasta into the boiling water.  Cook the shrimp until almost done then add the rest of the ingredients back to the skillet.  Pour in the wine and stir to combine well.  Transfer the almost done pasta to the skillet.  Stir to combine the pasta and other ingredients.  The butter, wine, and pasta water will combine and make a sauce to coat everything.  Plate and serve.  This will serve 4 as an entree.
Tomato Fettuccine with Shrimp and Asparagus
If you don't have tomato powder, I believe tomato paste could be used for the same effect.  I would add a 6 oz can along with the wet ingredients and add additional flour to achieve the desired consistency.  I also think you could thinly slice Roma tomatoes and dry them until brittle and grind them into your own tomato powder.  I may have to break out the dehydrator to see how that works.
A tasty supper of Tomato Fettuccine with Shrimp and Asparagus
The final product had a distinct tomato flavor that went well with the shrimp, asparagus, and wine sauce.  The color is nice as well.

Give this pasta a try along with whatever you think will go well with it or use this whole recipe.  Either way, let me know what you think of the tomato pasta.

Uncle T

Wednesday, August 24, 2016

Green Tomato Relish

We tend to put in lots of tomato plants when we start the summer garden and this year was no exception.  For large fresh eating tomatoes I'd switched to Celebrity tomatoes a couple of years ago because they tend to stay relatively short yet produce heavily.  This year, in addition to the Celebrity tomatoes we put in Roma tomatoes.  The Romas were selected because they are not as juicy and would require less time to make homemade ketchup of the proper consistency.  Since I've not grown Romas before I planted them like I was used to planting Celebrity and other varieties.  In previous years, that meant that once the cages were around the tomato plants I had room to walk between the rows of tomatoes and harvest the ones that were ready.
The tomato jungle with pepper plants in front
Welcome to the tomato jungle.  The Celebrity tomatoes have gone crazy this year and have grown much longer and fuller than previous years.  The Romas grew more than I'd anticipated.  As a result of both varieties spilling over the tops of the tomato cages I have a huge tangle of tomatoes.  In order to harvest the Romas I have to crawl between the rows on my hands and knees.  I imagine I look a sight crawling through the tomatoes in a kilt.
This is why I have to crawl between the tomatoes to harvest
One problem with crawling between the tomatoes is the dislodging of green tomatoes before they are mature enough to finish ripening on the kitchen counter.  Since these tend to be small there is not much to be done with them.  I could save them up and when I had enough on hand to fill a jar I could ferment them.  On a whim while fixing supper I thought I'd whip up a green tomato relish to go with the pork chops I was fixing.


I've made it twice with slight variations and both were good.  I finally got around to searching the internet and found that green tomato relish is a thing but typically far different from mine.  Many are for large batches to can and almost all use far more ingredients.  The result is that the green tomatoes are not really that prominent in the flavor profile.  They also called for cooking the relish which softens the green tomatoes and changes the whole texture of the relish.  I wanted the crunch and the flavor.


A bowl of fresh Green Tomato Relish
Thus far, I've used this relish on both pork chops and chicken breasts.  Both were seasoned with a Szechuan seasoning blend I'm experimenting with.  The pork chops were pan fried in a little butter and the chicken breasts were pan fried in bacon grease left from preparing bacon for tomato pie.  The green tomato relish complimented both very well.
Pork chop topped with Green Tomato Relish, sautéed zucchini and onions, Parmesan smashed potatoes
Green Tomato Relish


2-4 small green tomatoes
1 small red tomato
1slice onion, 1/4 inch thick
basil
oregano
marjoram
parsley
salt
1 tsp olive oil
1 tsp apple cider vinegar
1 small hot pepper, optional


Dice the green and red tomatoes and put in a bowl.  Dice the onion and add to the tomatoes.  Mince the herbs, about 2 tsp each, and add to the bowl.  Add olive oil and vinegar and stir to combine.  Add salt to taste.  Relish is ready to top whatever you are having for supper.
Chicken breast topped with Green Tomato Relish, Parmesan smashed potatoes, and Tomato Pie
Optionally you can add some finely diced hot pepper to give a hint of heat.  I had a small, 1 inch long, jalapeno that I added to the relish that accompanied the chicken.  Another option if you don't have fresh herbs is to use dried Italian seasoning.  I did this once because I didn't want to get out in the heat again.


Later in the year, end of season, I may see about making a fermented version of this relish.  Given the small size of the dice it shouldn't take long.


Give green tomato relish a try if you are growing tomatoes or if you can get them from a Farmer's Market.  This relish goes well with both chicken and pork as well as an accompaniment to peas.  Let me know what you  think.


Uncle T

Saturday, July 30, 2016

Tomato Pie

I wrote about tomato pie early on but since I have better pictures and tomato pie is so good I figured it should have a post all its own.
A nice slice of Tomato Pie
I made the first one of the season a week ago.  It dawned on me during my early morning ride into work that tomato pie was something we'd not had yet this year.  It's amazing what you think about early in the morning while riding a motorcycle.  Luckily, I had some pie dough in the freezer from a previous pastry dish.

Tomato pie is something that is good served hot or cold.  It can also be served by itself as a light lunch.  You can't beat a good tomato pie.  So, without further ado, into the recipe.

Tomato Pie

3 - 4 ripe tomatoes
6 - 8 slices bacon
1 medium onion, diced
9 inch pie crust
2 1/2 cups shredded Mozzarella cheese
1 cup grated Parmesan cheese
Mayonnaise
salt
pepper
Basil

Slice tomatoes 1/4 inch thick.   Spread on a rack in a single layer and sprinkle with kosher salt.  Allow to drain the juices for at least 20 minutes, longer is acceptable.
Salted tomatoes draining on a rack.
Slice bacon into 1/4 inch pieces and fry until crispy.  Once done transfer to a paper towel to drain.

For the topping, put the 2 cups of Mozzarella and 1 cup of Parmesan cheese in a bowl.  Add pepper to taste.  Add mayonnaise until you have a slightly spreadable mix.

Blind bake the pie crust at 450F for 15 minutes.  Once the crust is lightly browned you are ready to assemble the pie.

To assemble the pie, spread 1/2 cup of shredded Mozzarella in the bottom of the crust.  Spread a layer of tomatoes, overlapping to cover the entire bottom of the pie.  Sprinkle half the bacon and half the onion on top of the tomatoes.  Add some Basil evenly over the layer.  Repeat with the next layers.  Add the topping in an even layer then bake at 450F for 15 - 20 minutes or until the topping is browned to your satisfaction.
Tomato Pie fresh from the oven
If you don't have fresh Basil, a good option is to sprinkle Italian seasoning on the pie in its place.  Heck, use whatever herbs you think would suit your fancy.
Tomato Pie with green tomato relish chicken and smashed roasted potatoes
 Tomato pie is well worth the time it takes to make it.  Make it and amaze your friends.  If you like tomatoes I'm certain you'll love tomato pie.  It goes with any meal or it can be a like meal in itself.

Let me know how you like it.

Uncle T

Thursday, July 7, 2016

Candied Ginger

The good wife has been busy canning peaches from our tree these past few weeks.  It got to the point that she was looking for different recipes to use.  We had plenty of canned peaches, peach jelly, peach preserves, and peach salsa so the next recipe she found to try was Ginger Peach Jam.  She found this recipe online at www.peachtruck.com.


One of the ingredients for this recipe was candied ginger.  That is not something that we have on hand.  I don't even think we've ever bought any before.  We added the candied ginger to our grocery list and headed out.  Once we found it we suffered a major case of sticker shock.  Needless to say, I jumped on Google to see how much trouble it would be to make our own.  It turns out it is not difficult and you can make it far cheaper and end up with multiple products.


First you need to get some fresh ginger.  Try to avoid the larger ones as they can be a bit stringy.  Sometimes you can find something called spring ginger in Asian markets that has a milder flavor if you don't want your candied ginger to have a strong flavor.  I used regular ginger. 


To prepare the ginger, peel it and cut into 1/8th inch thick slices.  A mandolin makes this quick and easy.


Get a pot of simple syrup boiling on the stove.  I used 2 cups of water and 2 cups of sugar.  The next time I'll probably up it to 3 cups each. 


Once the sugar is dissolved and the mixture is back to a boil add the sliced ginger.  Stir to get the ginger evenly distributed and bring back to a boil.  Reduce to a simmer and cook for about 30 minutes or until tender.  My ginger had just a slight bit of resistance left when poked with a fork.


Pour the mixture into a strainer over a large bowl.  You'll want to save the syrup as it in now strongly ginger flavored.  I ended up with about 10 ounces of ginger syrup.  A little bit mixed with some club soda and you have a tasty drink similar to ginger ale.  You can vary the amount of syrup to make the ginger flavor as strong as you like it to be.
Ginger syrup
Spread the drained ginger slices on a drying rack in a single layer.  Let them dry until they are just slightly tacky.  If they are too wet the sugar will just melt into them.  Drying can take 5 hours or more depending on humidity.  I put mine in front of a fan and they were acceptably dry in about 2 hours.
Sliced ginger boiled and dried
Put some sugar in a bowl and add the ginger.  Toss to completely coat the ginger and return to the drying rack to complete the drying process.  Once the sugar coated ginger is dry it is ready to eat as it is or use it in a recipe.  Any not used immediately can be stored in an air tight container.  Save the leftover sugar for flavoring tea or using in a recipe as it will have a slight ginger flavor.  I sugar coated the ginger in batches so there would be less sticking together and I could use less sugar in the bowl.
Candied Ginger ready to use
The candied ginger and the ginger syrup both make great additions for recipes and for eating on their own.  Ginger is reputed to be a home remedy for nausea so that is an extra reason to keep some around.  I don't know if it'll help or not but the flavor is so good you'll feel better regardless.
The final product
I think I had about 30 minutes of active time in this project.  The rest of the time is spent doing other things while the ginger is either boiling or drying.  In the end, as is usually the case, the fresh made is a far superior product than what you can get at the store.


Give this a try.  You'll have a tasty snack at least.  I'm not sure how long this will last but I'm not sure it'll be around long enough to go bad.  If you do make it, let me know how it turned out.


Uncle T


Tuesday, July 5, 2016

Mediterranean Sprouted Rice and Quinoa with Sheep Sausage

I know I've mentioned how much I enjoy my pressure cooker.  Well, I really enjoyed it again the other night.  I was thinking about what to make for supper using what was on hand and without having to get overly complicated.  I wanted to use the sprouted rice and quinoa and finding the Thessaly sausage in the freezer provided the inspiration.


Thessaly sausage is a lamb sausage from Greece as I understand it, though I have found sites through Google claiming Thessaly sausage is beef.  Since more say it is lamb I'm going with lamb.  That said, mine was made with sheep, Rainbow the Ram to be exact.  Yes, once again I'm using homemade sausage.  I know there's not a lot of difference but there is a flavor difference between lamb and grown sheep.  Since the determination between the two is age I figure I'm still following the intent of the sausage. 
Mediterranean Sprouted Rice and Quinoa with Thessaly Sausage
The sprouted rice and quinoa were cooked using the same method I'd use for brown rice in the pressure cooker.  The rest of the ingredients were stirred in at the end.  This ended up being a simple yet tasty and filling meal.  The two cups in the recipe refers to the rice measuring cup that came with the pressure cooker. 


Mediterranean Sprouted Rice and Quinoa


2 cups Sprouted Rice and Quinoa, 1.5 cups if cooking on the stove top
3 cloves garlic, minced
2 Tbs olive oil
1 15 oz can diced tomatoes
6 oz crumbled Feta cheese
1 Tbs minced Basil
1 Tbs minced Oregano
1 Tbs minced Thyme
1 Tbs minced Marjoram
2 Tbs minced Italian Parsley
salt
pepper


Put sprouted rice and quinoa mixture into the pressure cook and add liquid to the 2 cup line.  Add olive oil and garlic to the pressure cooker.  Stir to mix garlic in well.  Put on lid and set for pressure cooking for 7 minutes.  Once the timer goes off, allow the pressure to release naturally.  Remove the lid and stir to fluff.  Add the diced tomatoes, Feta cheese, and herbs and stir to combine.  Add salt and pepper to taste.  Serve with grilled meat and enjoy.  Serves 4 - 6.


For a bit of extra flavor you can use broth instead of water to cook the sprouted rice and quinoa.  I used some venison broth I had in the freezer.
Left over Mediterranean Sprouted Rice and Quinoa with Mergez Sausage
We had the leftovers for supper a couple of nights later and the Mediterranean Sprouted Rice and Quinoa reheated well in the microwave.  I added a 2 Tbs of water to it to help steam it and fluffed it halfway through.  Since we'd eaten our last package of Thessaly sausage I grilled some Mergez sausage to go with it.  Mergez is a spicy lamb sausage from North Africa.  Again, this was made with Rainbow the Ram.  I think we like the pairing with the Mergez slightly better.  I think that grilled meat skewers, especially lamb/sheep, seasoned in a Mediterranean style would go well with it also.


Since flatbreads are eaten with meals in many countries around the Mediterranean I was wanting a flat bread with out meal.  Sadly, I didn't think about it in time to try out one of several pita recipes I'm wanting to try.  I ended up heating up some flour tortillas to use for the flat bread. 


I hope you give this recipe a try.  The sprouted rice and quinoa both are tasty and good for you so it is a winning combination.  If you try it let me know what you think.


Uncle T

Wednesday, June 8, 2016

Mushroom Fettuccine with Miso Beef and Asparagus

Several years ago while we were stationed in Texas we would drive up to Wimberley for their Market Days.  The Wimberley Market Days was the 1st Saturday of the month and was a combination farmer's market, flea market, and arts and crafts show.  It took several hours to get through the whole thing even if you just took a quick glance at each booth.

One of the regular vendors would demo their pasta.  They had dry pastas of several flavors that they had developed.  Our favorites were the mushroom and the hot pepper.  I've not found any quite like them since we moved to Virginia.

I've tried different flavored pastas with mixed success.  My worst attempt was making black bean pasta.  The flavor was good but the texture was sadly lacking.  I've been researching alternative pastas and think I have a handle on some of the fixes.  I decided to test some of the changes on making the mushrooom pasta.

Most grocery stores have some small packages of dried mushrooms.  We went to Grand Mart, our favorite international market, and bought a large package of dried shitake mushrooms.  We also picked up a jar of miso at the same time.  I'd been thinking of the miso for soup but thought it would be an excellent seasoning.  I actually got Korean fermented soybean paste which is called Doenjang.  As I understand it, doenjang is a bit stronger flavored than miso.  I'm still calling it miso beef because more people are familiar with miso than the name doenjang.
Doenjang, fermented soybean paste


Mushroom Fettucinni

1/2 cup powdered mushrooms
1.5 cups flour
1 tsp salt
1 tsp olive oil
3 eggs plus 1 egg yolk

Put a handful of dried mushrooms in a food processor/Vitamix and reduce to powder.  Put 1/2 cup of the mushroom powder in a bowl.  Add the flour and salt and stir to combine.  Add the eggs, egg yolk, and olive oil and stir.  Once most of the ingredients are combined, turn out on a smooth surface and knead until smooth.  Wrap in plastic and let sit for 20 - 30 minutes.  Cut the pasta into 4 pieces and run through the pasta maker to flatten and thin.  Cut into desired lengths then run through the fettuccine cutter.  Spread on a tray with a bit of flour and repeat with the rest of the dough.  Add the fettuccine to heavily salted boiling water and cook until almost done.  This will just be a few minutes.  Add to the miso beef and asparagus and combine thoroughly.  The fettuccine will finish cooking during this mixing.
These are the dried Shitake mushrooms I used
Miso Beef and Asparagus

1 lb beef, I used strip steaks
1 lb asparagus
1/2 cup miso paste
2 Tbs olive oil

Cut beef into thin strips and put in a bowl.  Add the miso paste and mix thoroughly.  Let this stand for at least an hour.  Trim the asparagus then cut into thirds.  Heat olive oil in a skillet and add the asparagus and sprinkle with salt and pepper.  Once the asparagus has cooked for 1 - 2 minutes add the beef to the skillet.  Cook until the meat is almost done.  This should be timed to be around the same time the fettuccine is done.  The pasta water that transfers with the fettuccine will combine with the miso paste to make a nice sauce to coat the noodles.  Serve and enjoy.  This will make 4 good size servings.
Mushroom Fettuccine with Miso Steak and Asparagus
This is a mighty tasty meal that reheats well if you have leftovers.  This would also work well with pork or chicken.  Give these out of the ordinary ingredients a try.  Let me know what you think.


Uncle T